Install Google Maps on iOS 6 iPhone 4S, New iPad, iPad2, iPod Touch 4th Generation, iPhone 4 and 3GS? Just Bookmark It On Your Homescreen! Step by Step Guide!
One of the many new features that iOS6 firmware update brought to supported iPhone, iPod Touch, and iPad models was Apple's very own Maps application, which altogether replaced the familiar one from Google.
Really, everything would have been so cool had Apple's app proved as good as Google's; But the problem is, that's hardly the case. Millions of users complained about misplaced landmarks, inaccurate location data, and distorted images, among other issues. In fact, even the Cupertino-company's CEO, Tim Cook, recently said sorry for the lackluster performance of the software and even advised users to check out Maps by competing companies in the meantime.
Thankfully, while Google has yet to release a Maps application for iOS, which can be downloaded and installed via the App Store, users can still enjoy most features of the stand-alone app via Safari mobile web-browser.
Here's TechPinas' step by step guide (with screen shots) on how you can bookmark Google Maps web-app on your iPhone, iPod Touch or iPad. Clicking on this shortcut will allow you to easily and conveniently access the page when you're connected to a mobile network or via WiFi.
1. Open the new Safari mobile browser.
2. Go to maps.google.com
3. After it loads, click on the Share button on the lower portion of the browser:
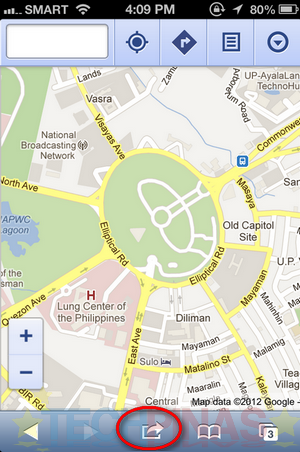
You will get the Maps toolbar on top of the web-app once it loads completely.
4. Click on Add to Homescreen button:
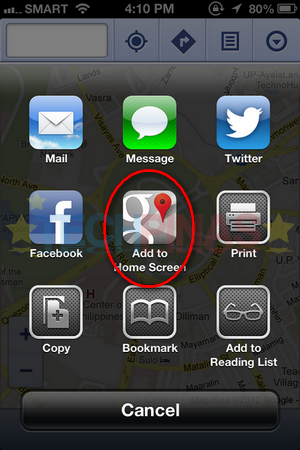
5. You may change the name of the bookmark but I'd suggest that you just keep it as is. Then, click on Add button on the upper right corner:
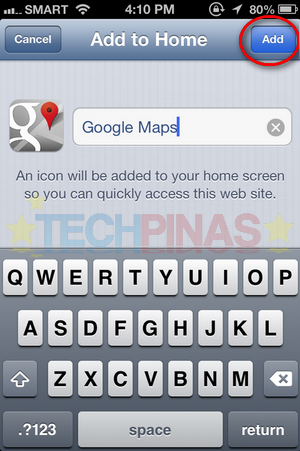
6. After doing that, you'll get this icon on your homescreen. Again, this will give you quick and easy access to the Google Maps web-app so if you wish so, you can pin this on the icons tray.
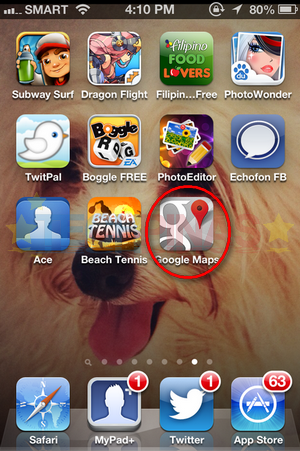
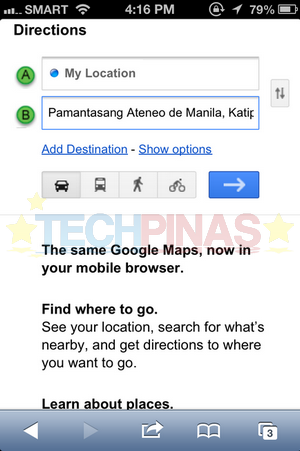
7. Don't forget to Allow Google Maps to use your current. You will get the notification every time you open the web-app; Just click on Allow button. This will let you enjoy useful features of like My Places and my favorite, Directions.
Ain't that easy?! Now, be a hero or a life-saver by sharing this post with our fellow iOS users on Facebook and Twitter.
Really, everything would have been so cool had Apple's app proved as good as Google's; But the problem is, that's hardly the case. Millions of users complained about misplaced landmarks, inaccurate location data, and distorted images, among other issues. In fact, even the Cupertino-company's CEO, Tim Cook, recently said sorry for the lackluster performance of the software and even advised users to check out Maps by competing companies in the meantime.
Thankfully, while Google has yet to release a Maps application for iOS, which can be downloaded and installed via the App Store, users can still enjoy most features of the stand-alone app via Safari mobile web-browser.
Here's TechPinas' step by step guide (with screen shots) on how you can bookmark Google Maps web-app on your iPhone, iPod Touch or iPad. Clicking on this shortcut will allow you to easily and conveniently access the page when you're connected to a mobile network or via WiFi.
1. Open the new Safari mobile browser.
2. Go to maps.google.com
3. After it loads, click on the Share button on the lower portion of the browser:

You will get the Maps toolbar on top of the web-app once it loads completely.
4. Click on Add to Homescreen button:

5. You may change the name of the bookmark but I'd suggest that you just keep it as is. Then, click on Add button on the upper right corner:

6. After doing that, you'll get this icon on your homescreen. Again, this will give you quick and easy access to the Google Maps web-app so if you wish so, you can pin this on the icons tray.

7. Don't forget to Allow Google Maps to use your current. You will get the notification every time you open the web-app; Just click on Allow button. This will let you enjoy useful features of like My Places and my favorite, Directions.

Ain't that easy?! Now, be a hero or a life-saver by sharing this post with our fellow iOS users on Facebook and Twitter.


.jpg)