Fix Weak WiFi Signal Reception After Windows 10 Upgrade
Last Monday - July 24, 2017, after delaying it for a couple of months, I finally installed the latest Windows 10 upgrade on my HP EliteBook.
I let the upgrade run overnight and just wrapped up the process when I woke up the next day.
After the fresh reboot running on the freshest version of the operating system, I immediately noticed a major issue that could affect my productivity on the laptop:
For some reason, the software update weakened by notebook's WiFi signal reception.
I immediately checked tech forums looking for a possible solution and I was surprised that so many consumers have actually experienced the exact same problem.
Thankfully, the issue is not hard to resolve. In fact, you just need to make a few clicks on your touchpad to fix it.
If you're currently facing the same conundrum, try this solution:
1. On your Taskbar, click on the Search Box beside the Windows button and type "Device Manager", click on the first result.
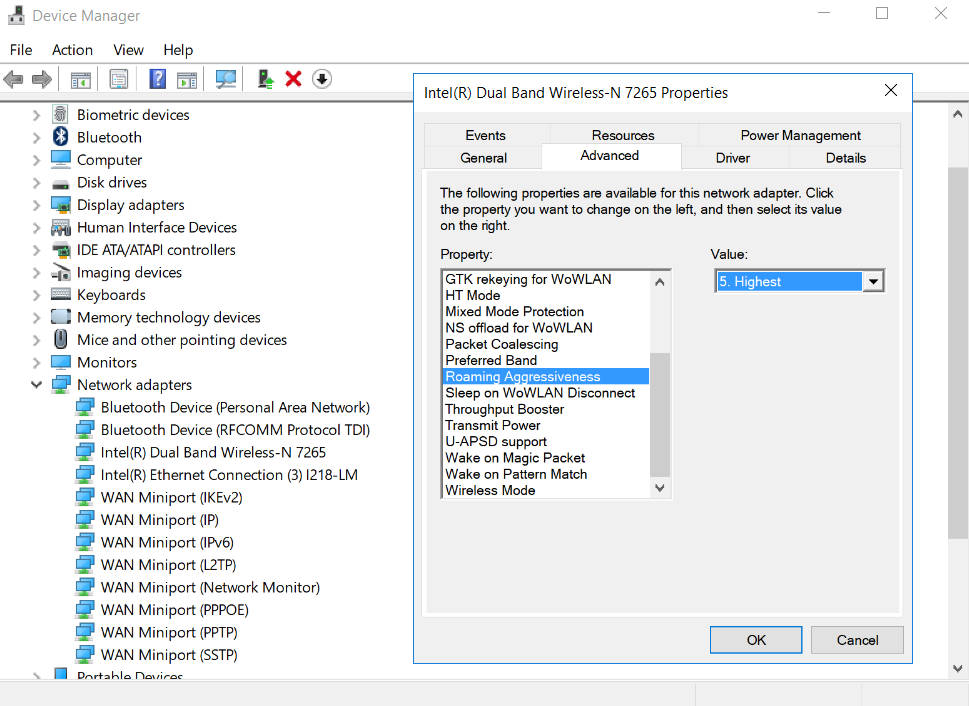
2. In Device Manager, click on Network Adapters.
3. Under Network Adapters, look for your WiFi adapter and click on it. The most common ones are made by Intel, Atheros, or Qualcomm.
4. In the Window that will pop up, click on Advanced tab.
5. Under Advanced Tab, go to Roaming Aggressiveness (or Roaming Sensitivity in some notebooks).
6. In the 'Value' drop-down menu on the right section, choose "5. Highest"
7. Click OK button.
8. Restart your laptop.

That's it! So easy, right?! Let me know if this fixed your problem via our comments section below.
I let the upgrade run overnight and just wrapped up the process when I woke up the next day.
After the fresh reboot running on the freshest version of the operating system, I immediately noticed a major issue that could affect my productivity on the laptop:
For some reason, the software update weakened by notebook's WiFi signal reception.
I immediately checked tech forums looking for a possible solution and I was surprised that so many consumers have actually experienced the exact same problem.
Thankfully, the issue is not hard to resolve. In fact, you just need to make a few clicks on your touchpad to fix it.
If you're currently facing the same conundrum, try this solution:
1. On your Taskbar, click on the Search Box beside the Windows button and type "Device Manager", click on the first result.
2. In Device Manager, click on Network Adapters.
3. Under Network Adapters, look for your WiFi adapter and click on it. The most common ones are made by Intel, Atheros, or Qualcomm.
4. In the Window that will pop up, click on Advanced tab.
5. Under Advanced Tab, go to Roaming Aggressiveness (or Roaming Sensitivity in some notebooks).
6. In the 'Value' drop-down menu on the right section, choose "5. Highest"
7. Click OK button.
8. Restart your laptop.

That's it! So easy, right?! Let me know if this fixed your problem via our comments section below.

